Peripherals Guide
Howdy truckers,
Depending on if you want to play with joysticks and a throttle or a steering wheel and pedals, you’ll likely want to adjust specific settings to get the best experience. We hope this handy guide will give you all the key information needed to start cruisin’ the galaxy in a whole new way!
• Getting Started
• Creating Sensible Bindings
• Peripheral Settings
• Quick Tips
• Community Collaboration
• Known Issues
• FAQ
Getting Started
Testing your Setup
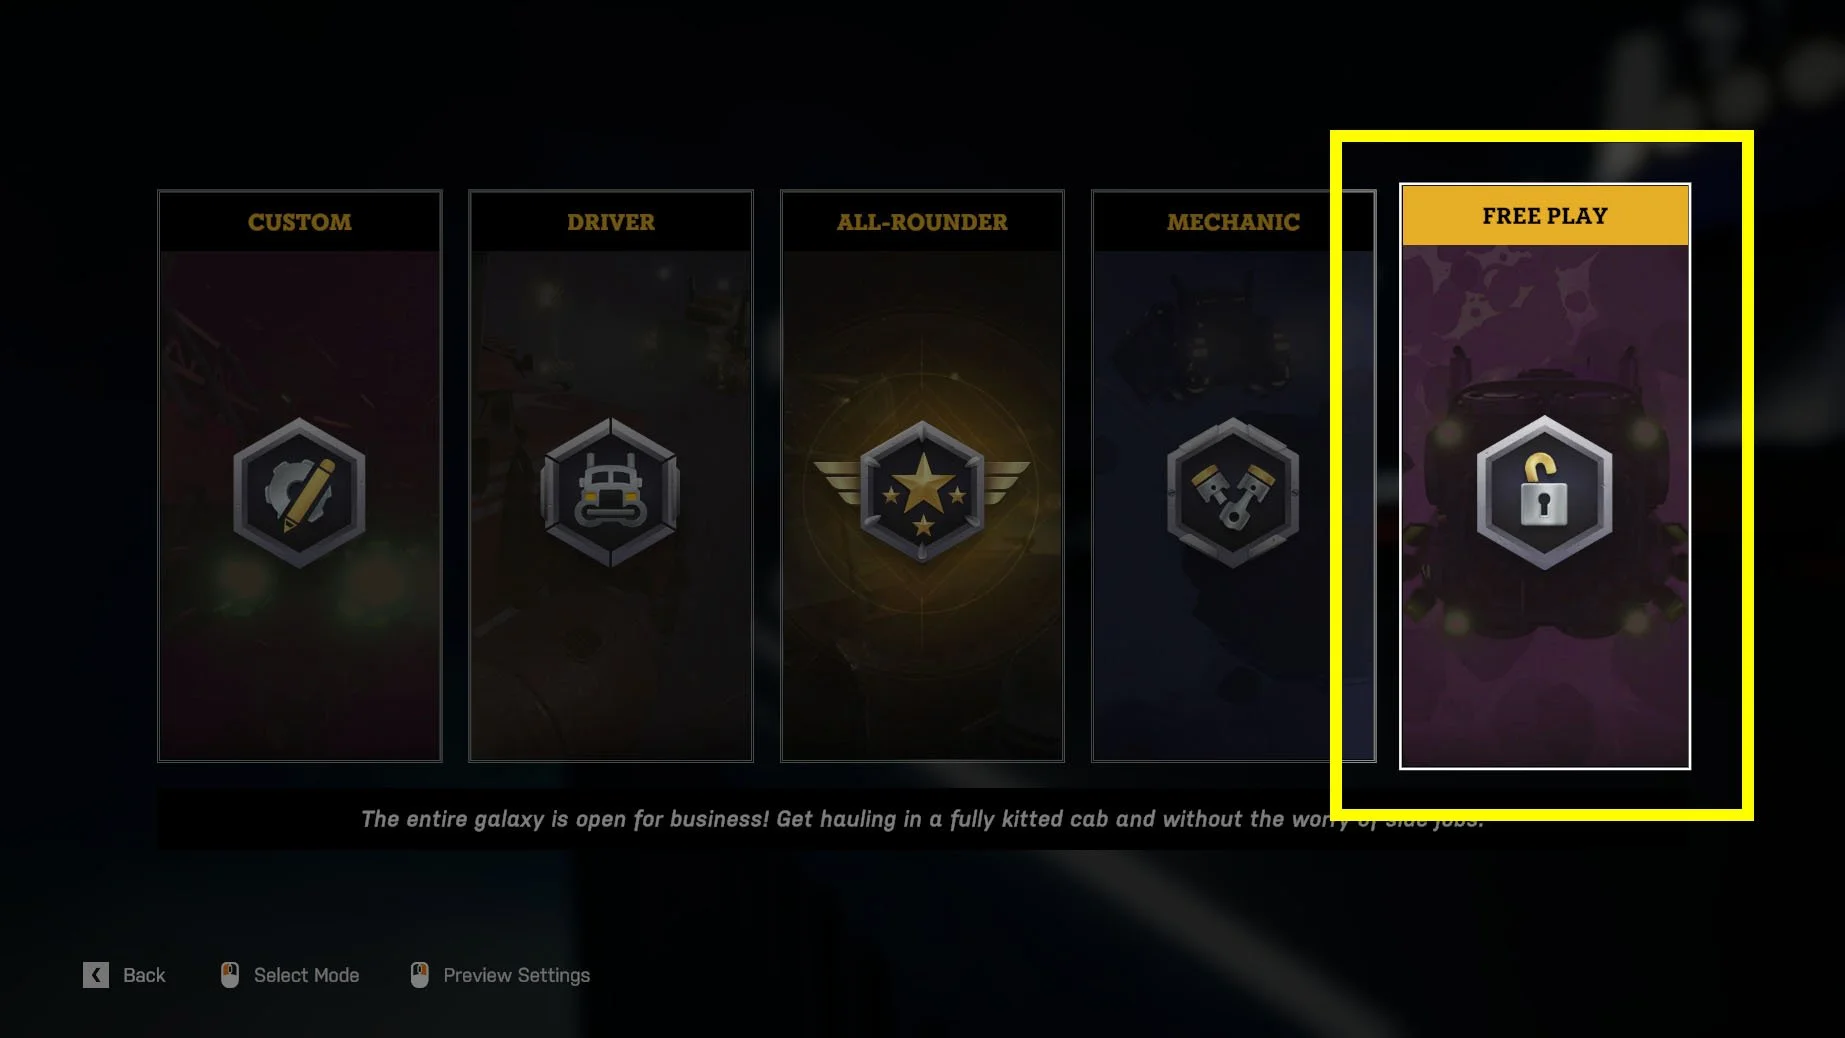
At the main menu choose “New Game” then select “Free Play”. This will skip tutorials, enable all truck features and is the easiest way to quickly jump into the game and test your peripherals
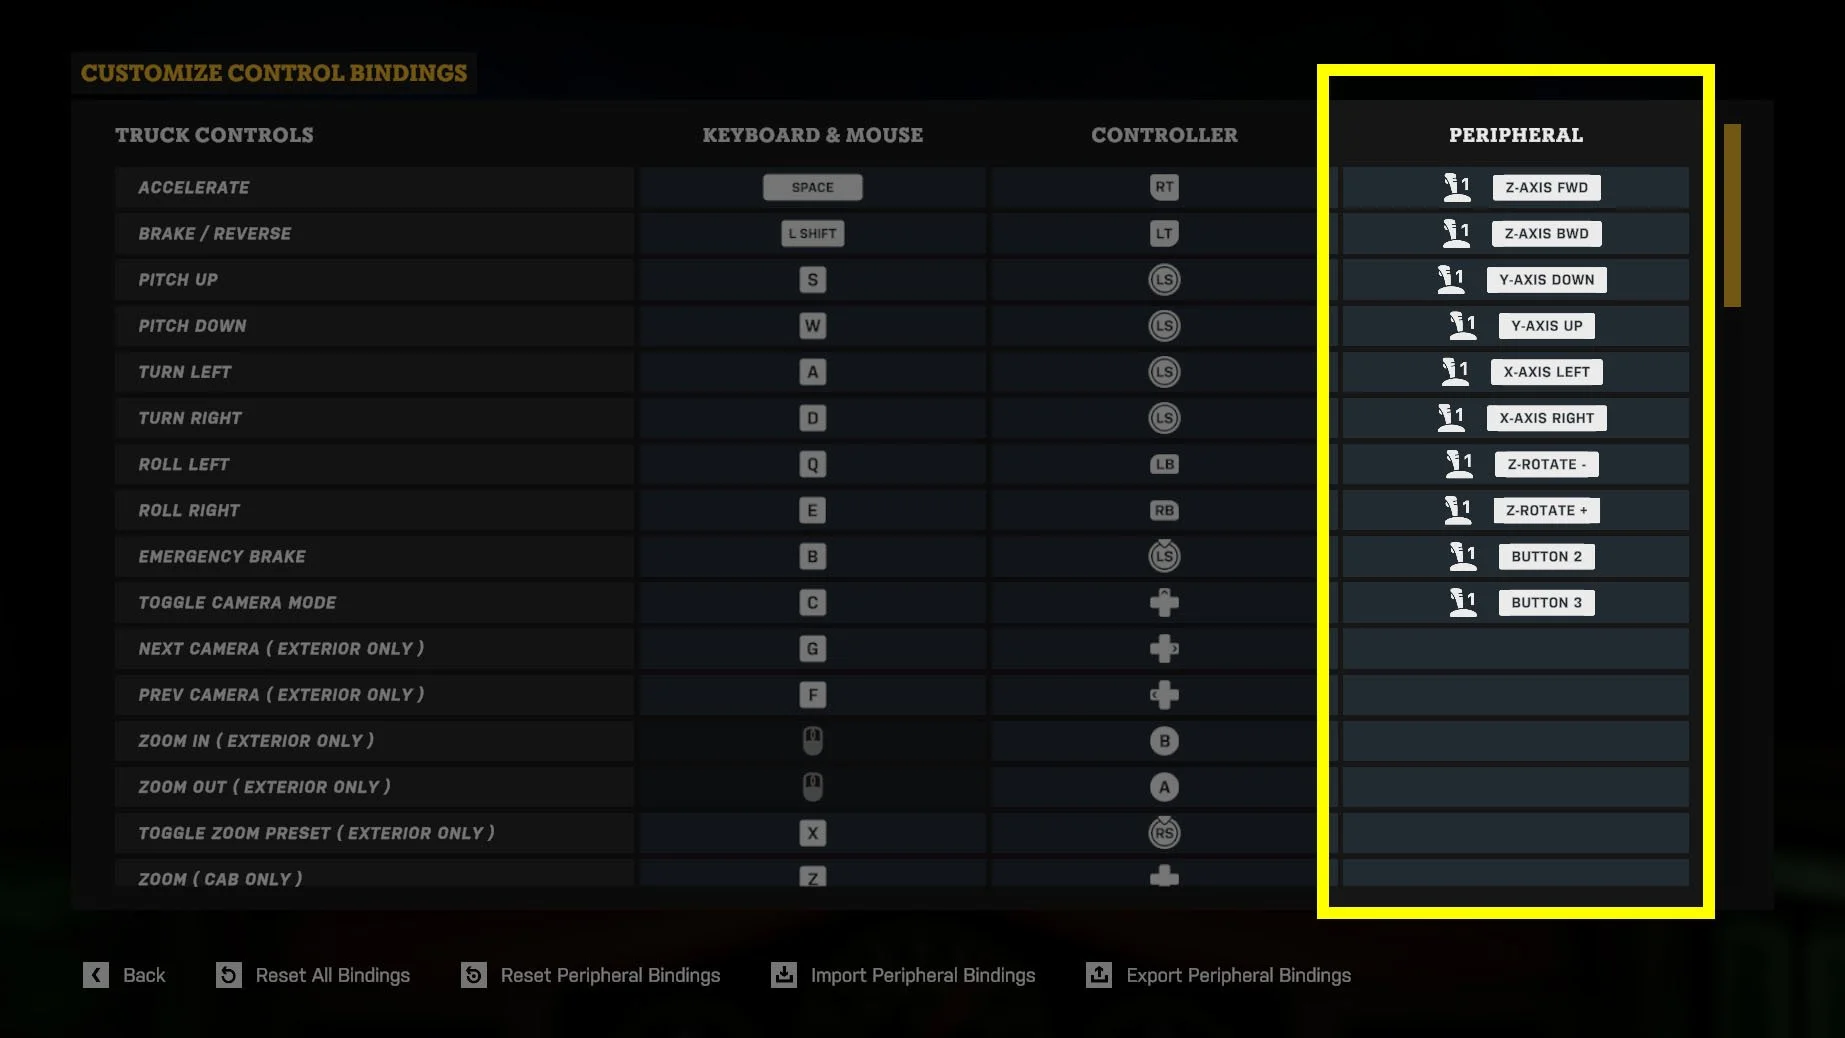
Add Bindings
Although some default controls might be assigned, you’ll likely want to modify these in the Custom Bindings screen. Here inputs for multiple devices can be assigned in the peripherals column.
To find this menu, press “Esc” to pause the game then select Options → Controls → Customize Control Bindings
Clear Bindings
Unwanted bindings can be cleared by pressing the right mouse button while highlighting the binding you wish to remove. This should make testing different combinations of binding much quicker.
Using a Throttle
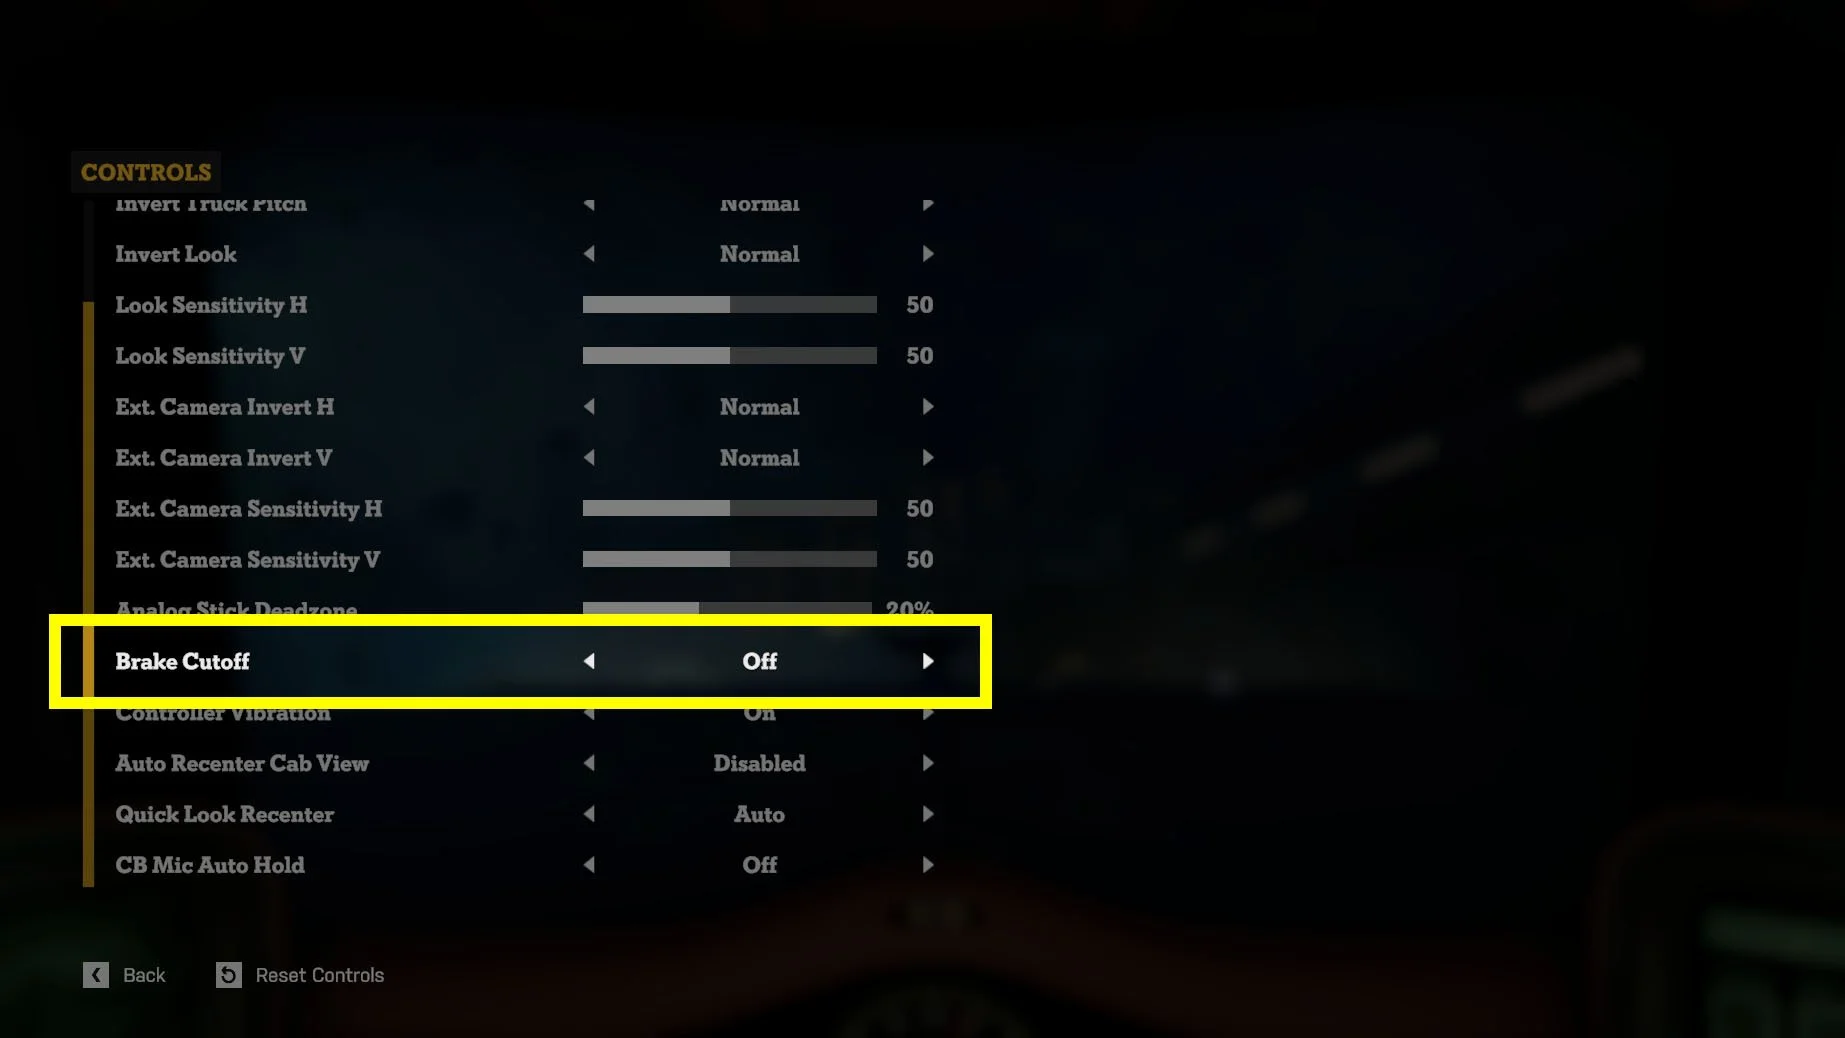
If you’re playing with a throttle press “Esc” to pause the game and go to “Controls” to adjust options. We recommend disabling “Brake Cut-off” for a smooth brake → reverse transition.
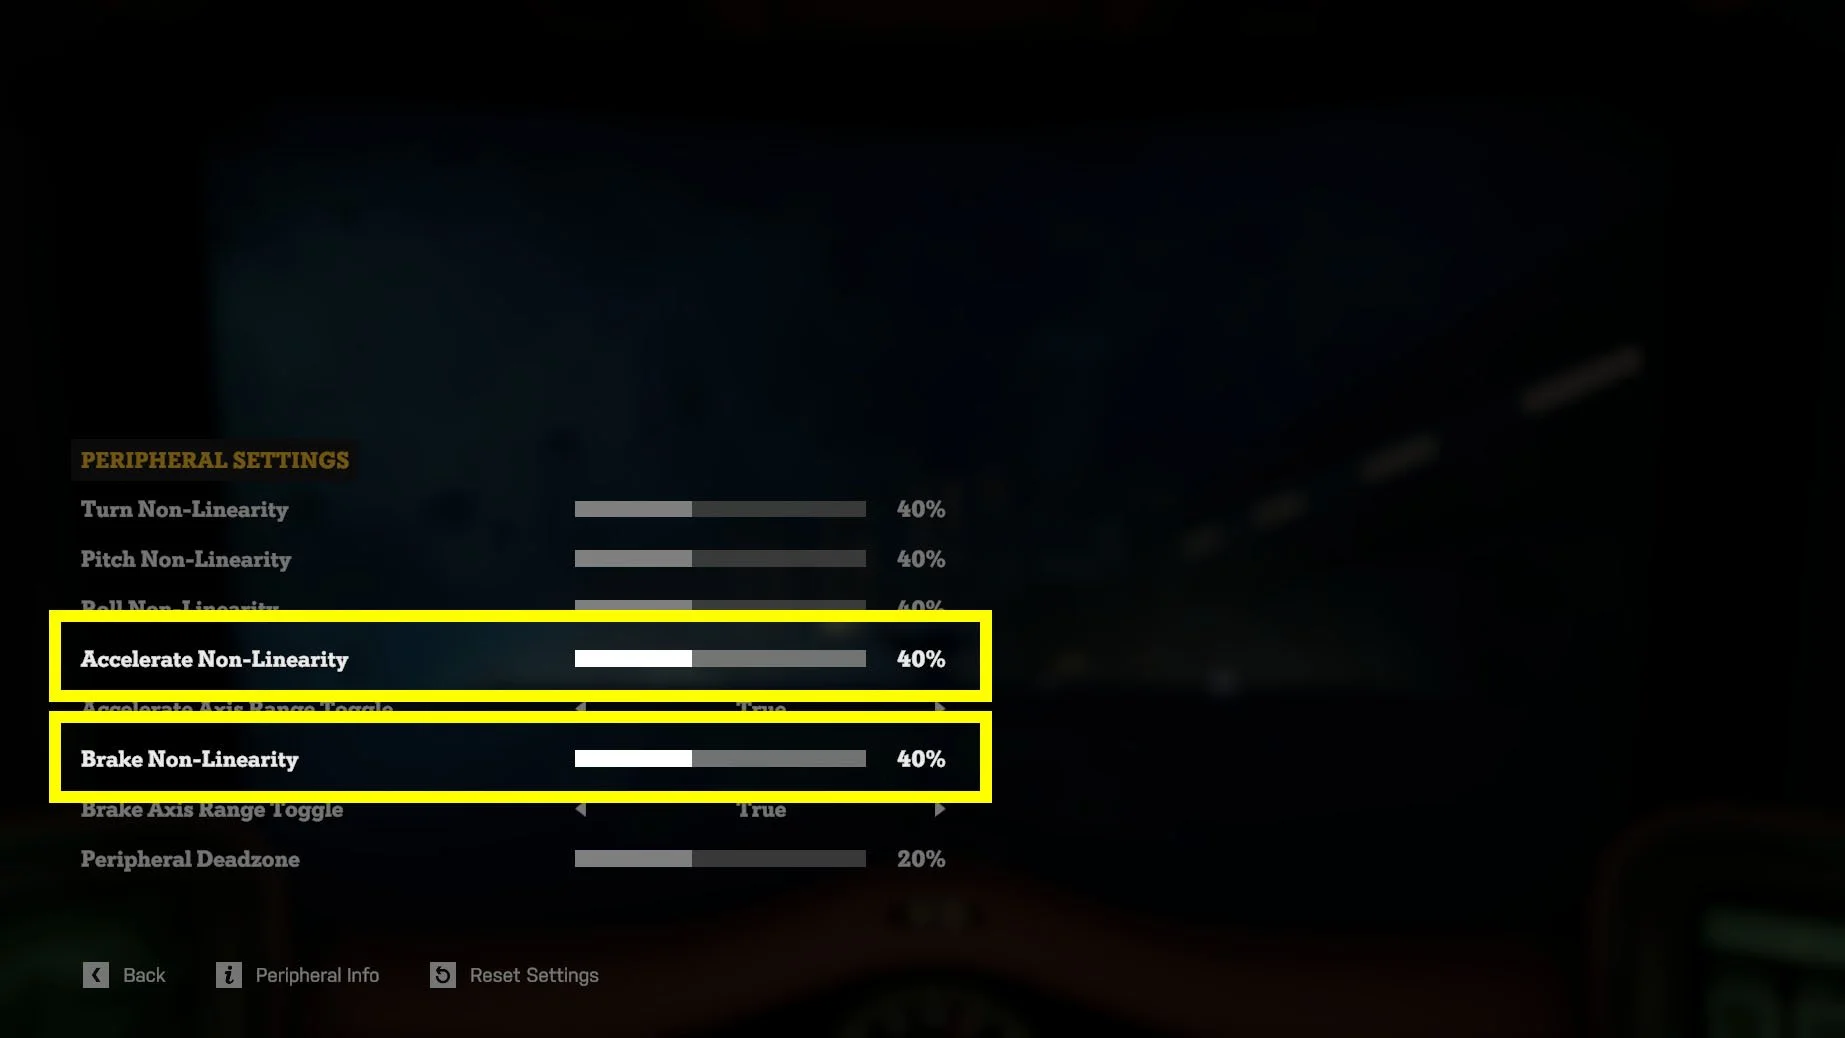
You might also want to tweak the non-linearity of the thrusters (e.g. how our power curves respond to throttle positions). This can be done by adjusting the Accelerate and Brake Non-Linearity settings in the Peripheral Settings screen.
Using a Steering Wheel
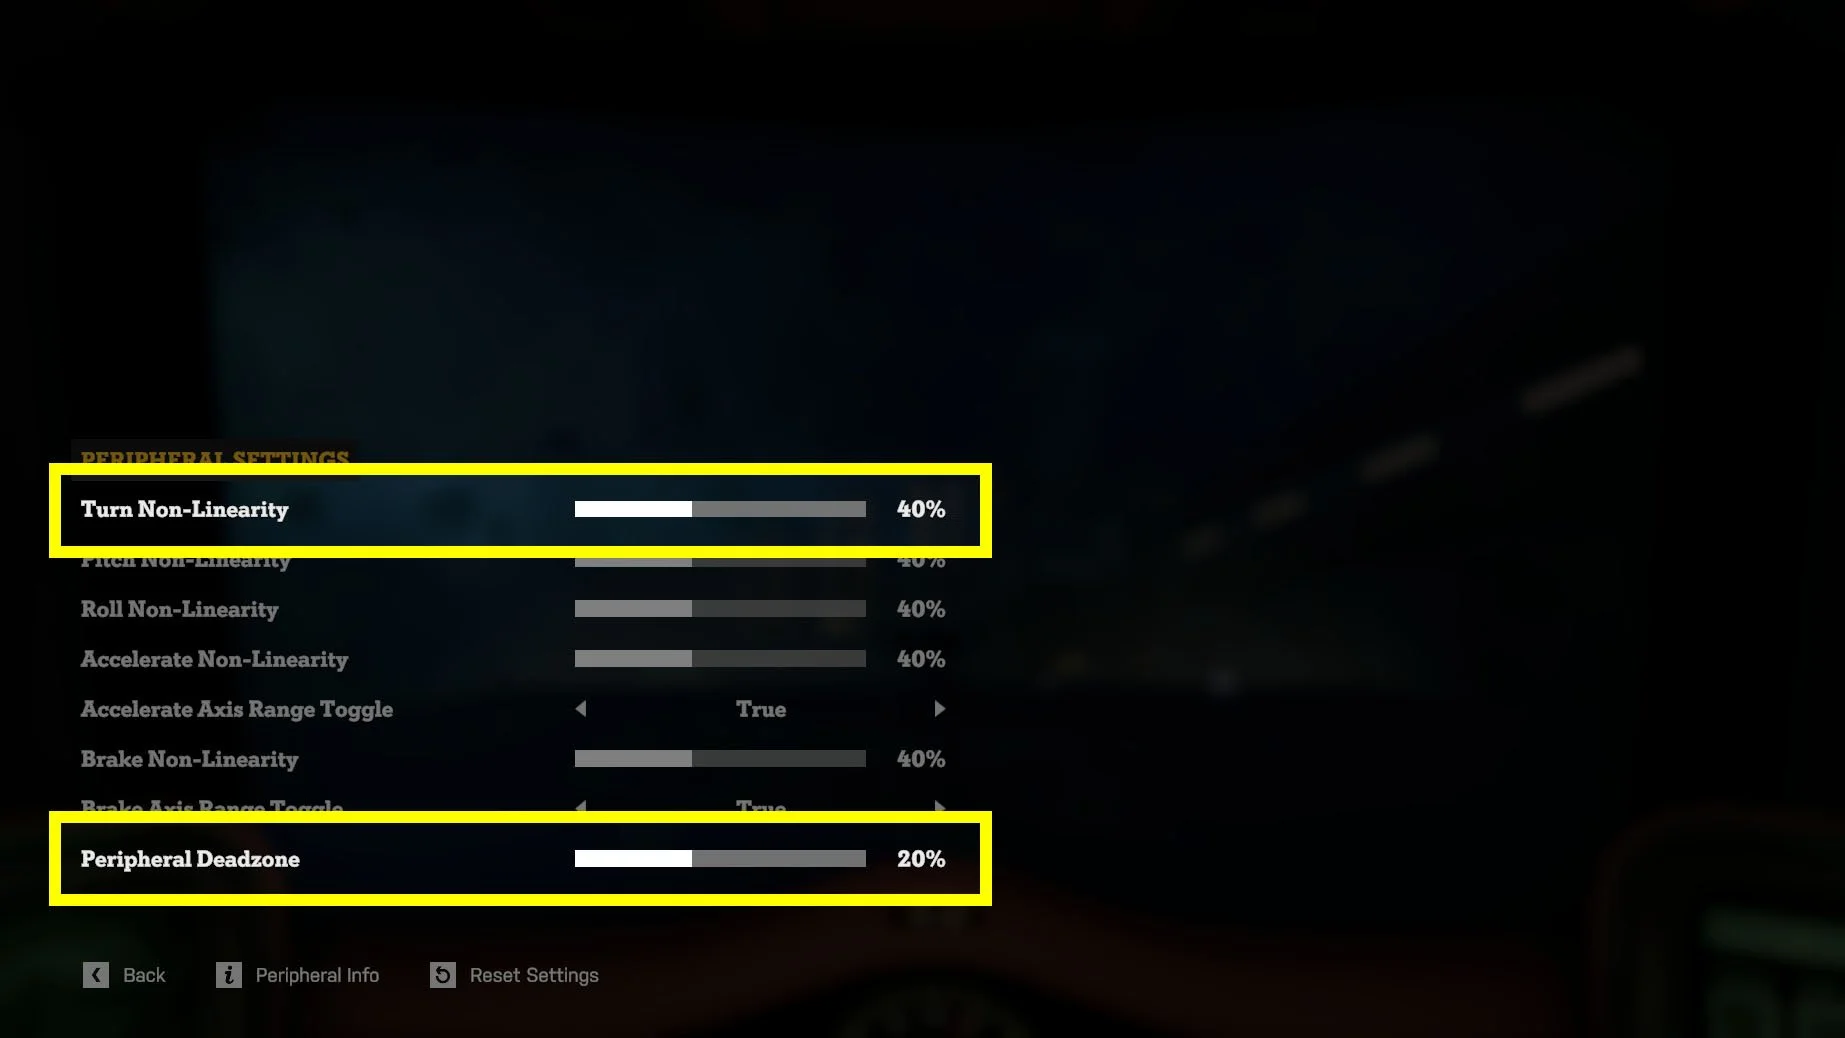
If you’re playing with a steering wheel there are some settings you might want to adjust for a better experience. Increasing “Turn Non-Linearity” and lowering “Peripheral Deadzone” will help make the wheel feel more sensitive, requiring less effort to turn.
Using Pedals
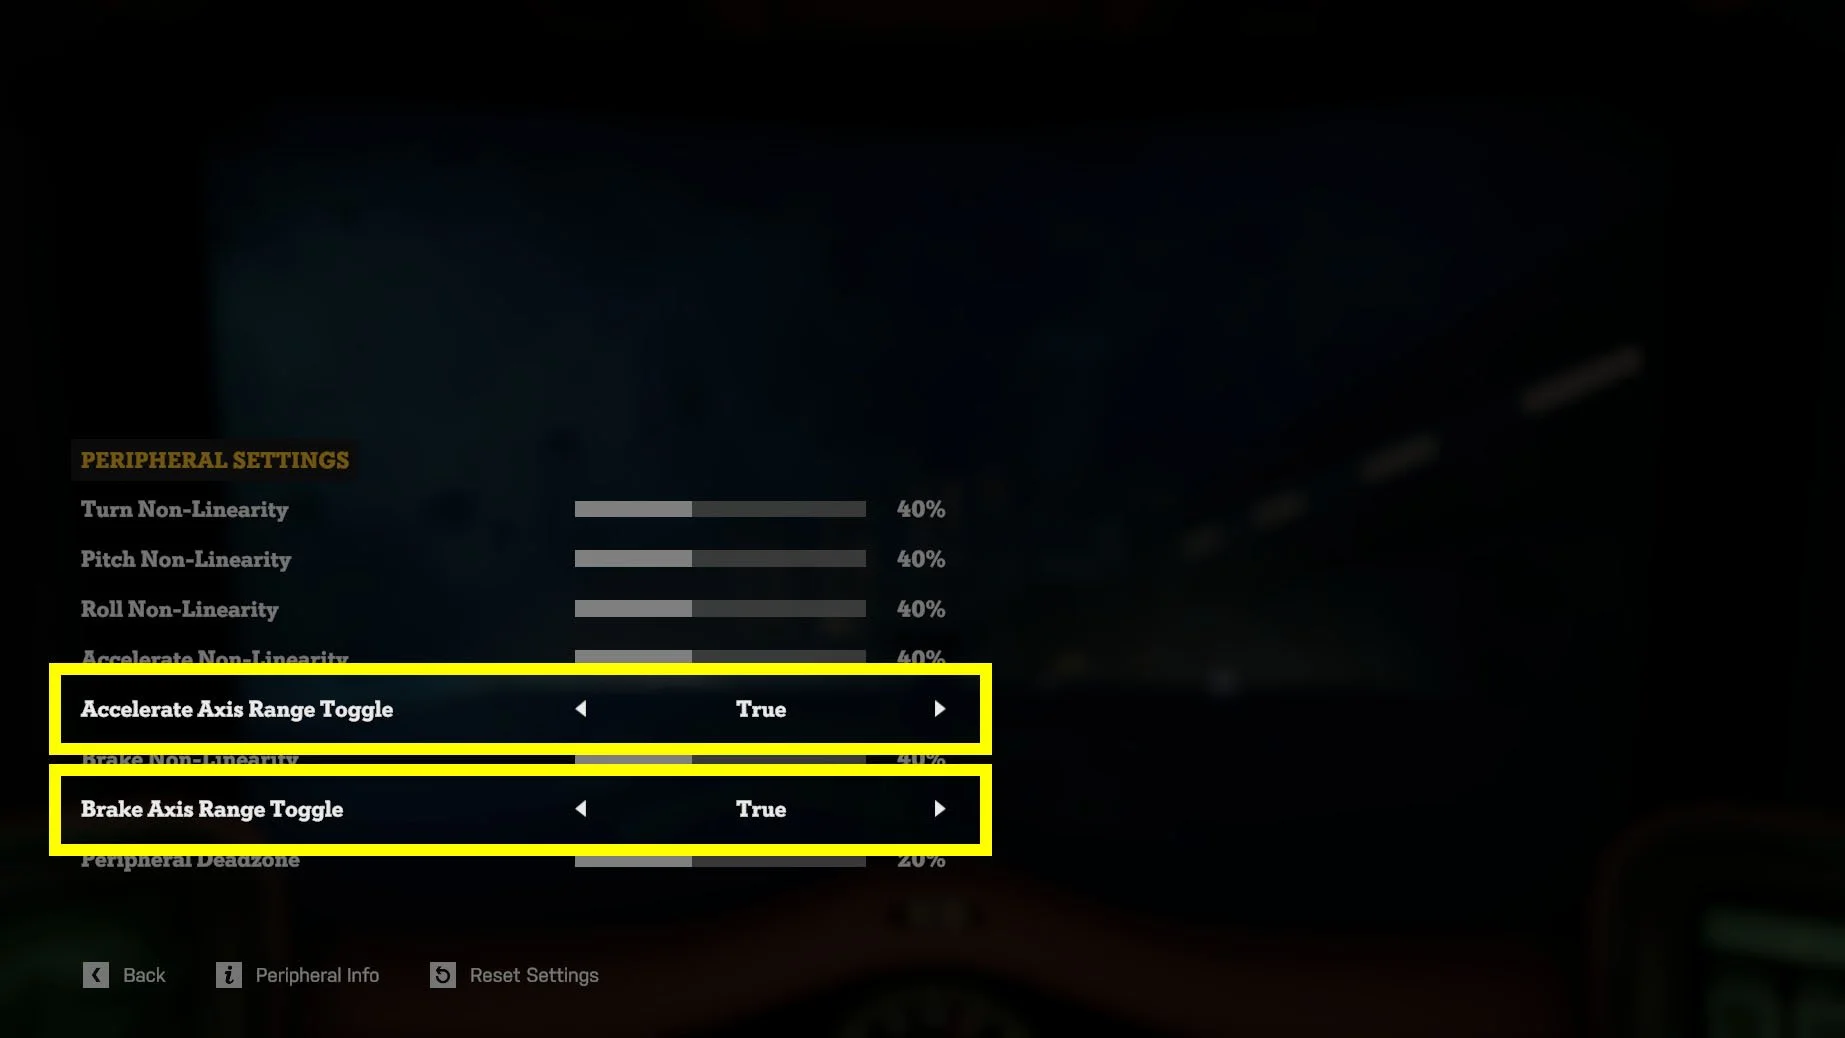
If you’re playing with pedals you’ll likely need to set both the accelerate and brake “Axis Range Toggles” to “True” in the Peripheral Settings Screen. This will allow the full range of the pedals to be used when applying power to the thrusters.
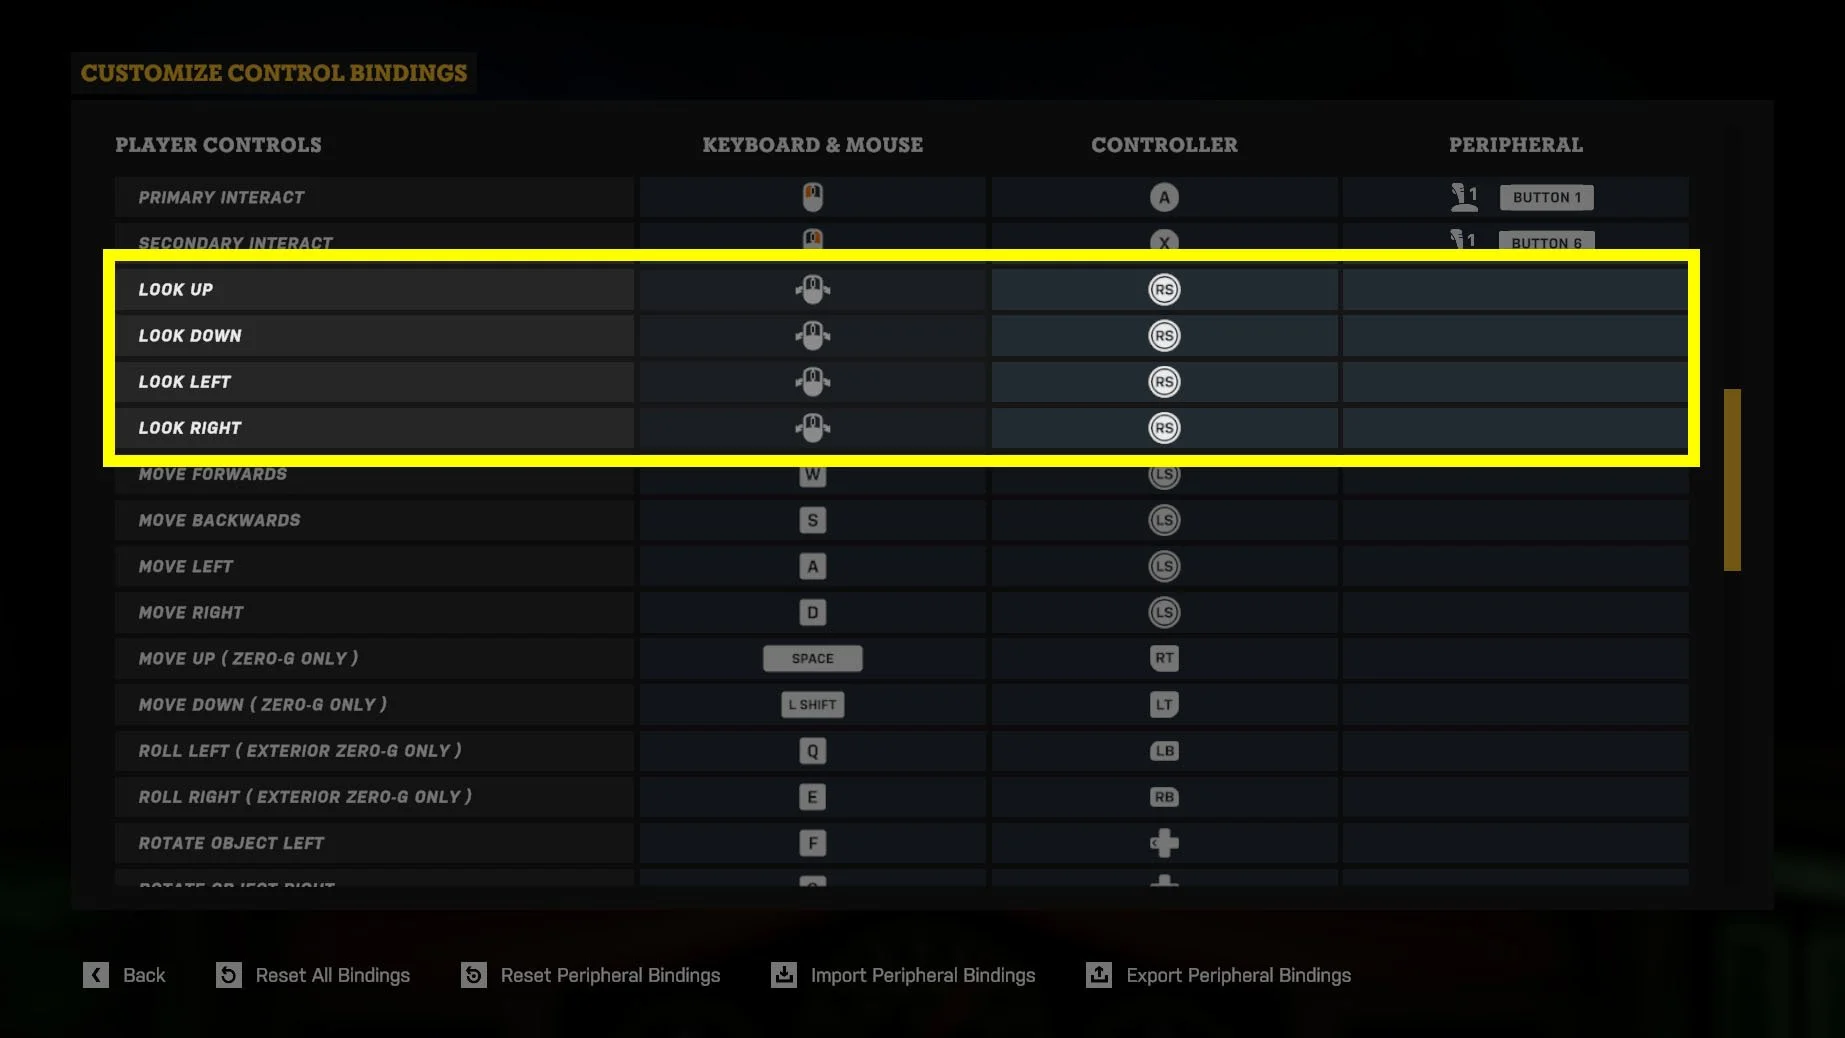
Using Free Look
If you want to use peripherals for Free Look while seated or for first person gameplay you can set up / down / left / right in the Player Controls section of the Custom Bindings screen.
Keep in mind that if the same bindings are used for both Free Look AND Quick Look the later will take priority.
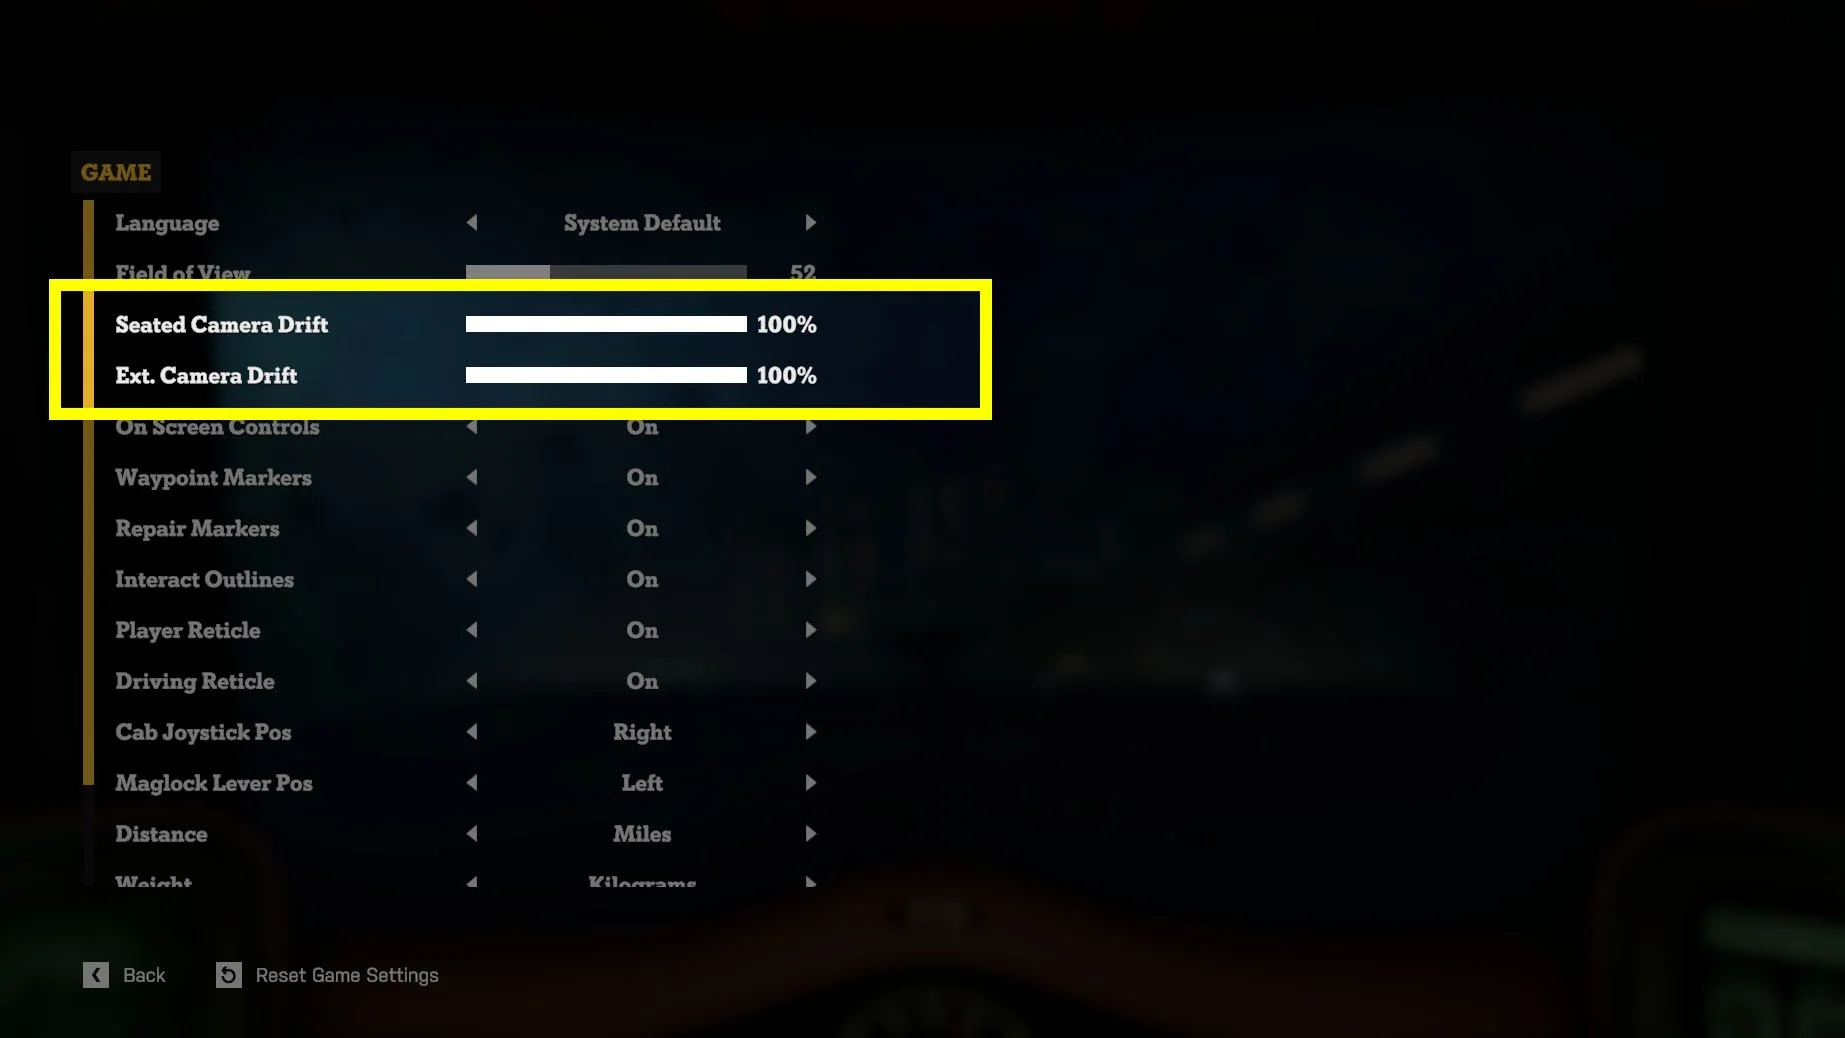
Camera Momentum
When you accelerate and brake the camera drifts to give a sense of momentum. We also have momentum on the external camera. When using a joystick, hotas or wheel this might not be wanted.
To disable this drift, press “Esc” to pause the game then Options → Game and adjust the camera drift sliders.

Creating Sensible Bindings
When setting up a peripheral you want to make sure essential controls have been set up alongside as many important bindings as the device sensibly allows.
The following inputs are essential when setting up custom bindings.
| CONTROL | NOTES |
|---|---|
| Accelerate |
• Forward thrust • Throttle forwards or acceleration pedal |
| Brake / Reverse |
• Reverse thrust • Throttle back or brake pedal |
| Pitch Up / Down |
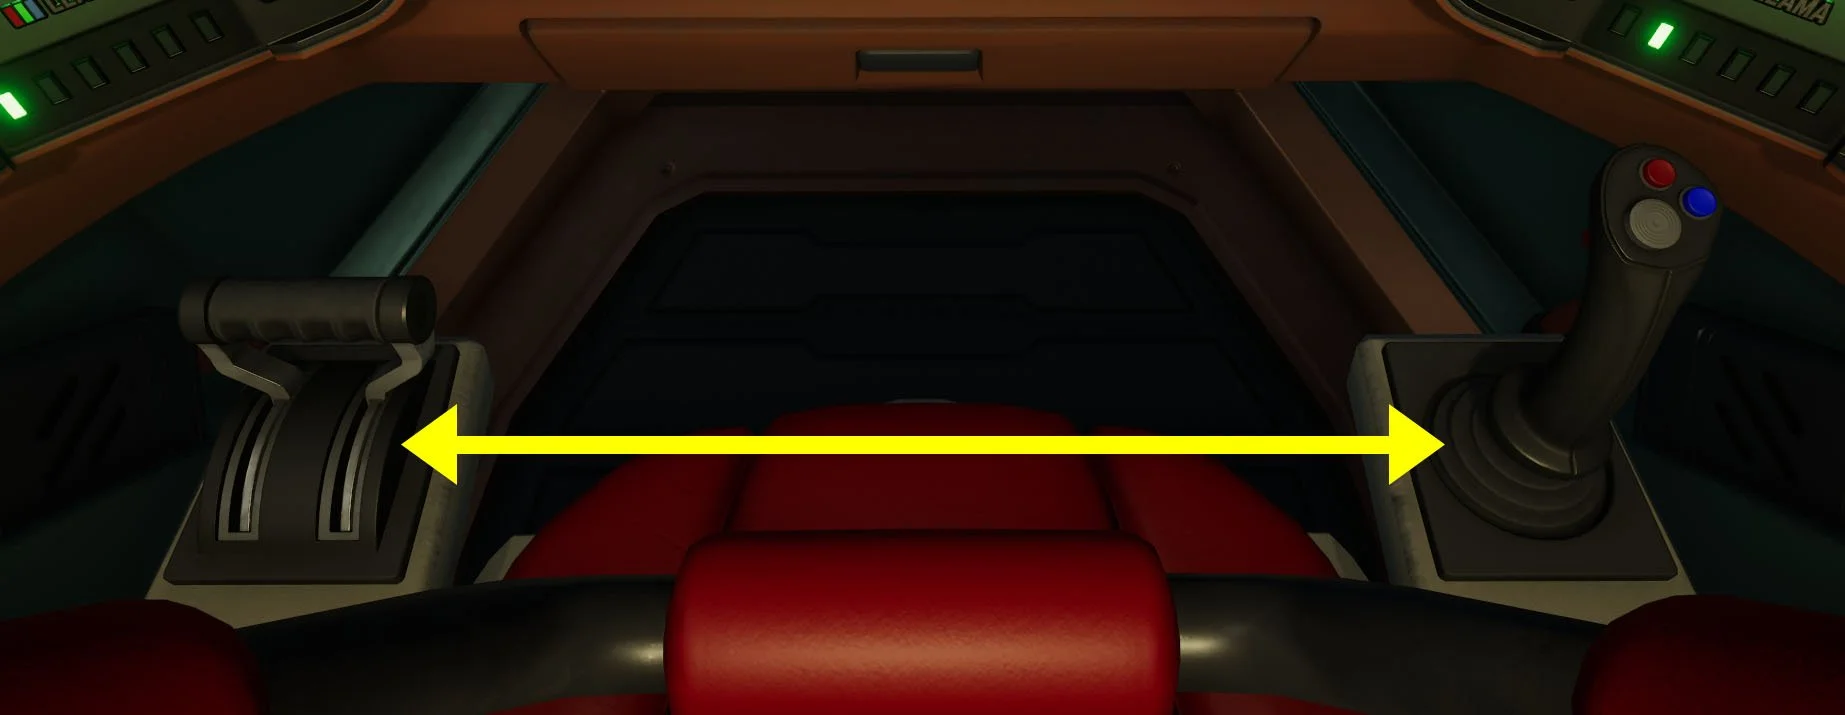
• Fires rear thrusters tilting truck up / down • Recommend setting up joysticks the following way ◦ Pull back to pitch up ◦ Push forwards to pitch down • Left / right paddles on a wheel work OK |
| Turn Left / Right |
• Fires rear thrusters turning truck left / right • Steering with wheel works OK |
| Roll Left / Right |
• Fires rear thrusters rolling truck left / right • Using the twist on a joystick works OK • Needs easily accessible buttons on wheel |
The following inputs are important for a smooth player experience and if there are enough inputs on a device they should be added in order of the importance listed below.
| CONTROL | NOTES |
|---|---|
| Emergency Brake |
• Lever to the right of the player in the cab • Acts like a handbrake • Works well on triggers |
| Toggle Camera Mode |
• Switches between 1st person and 3rd person camera • Only important if HAT switch / D-Pad is assigned to Quick Look |
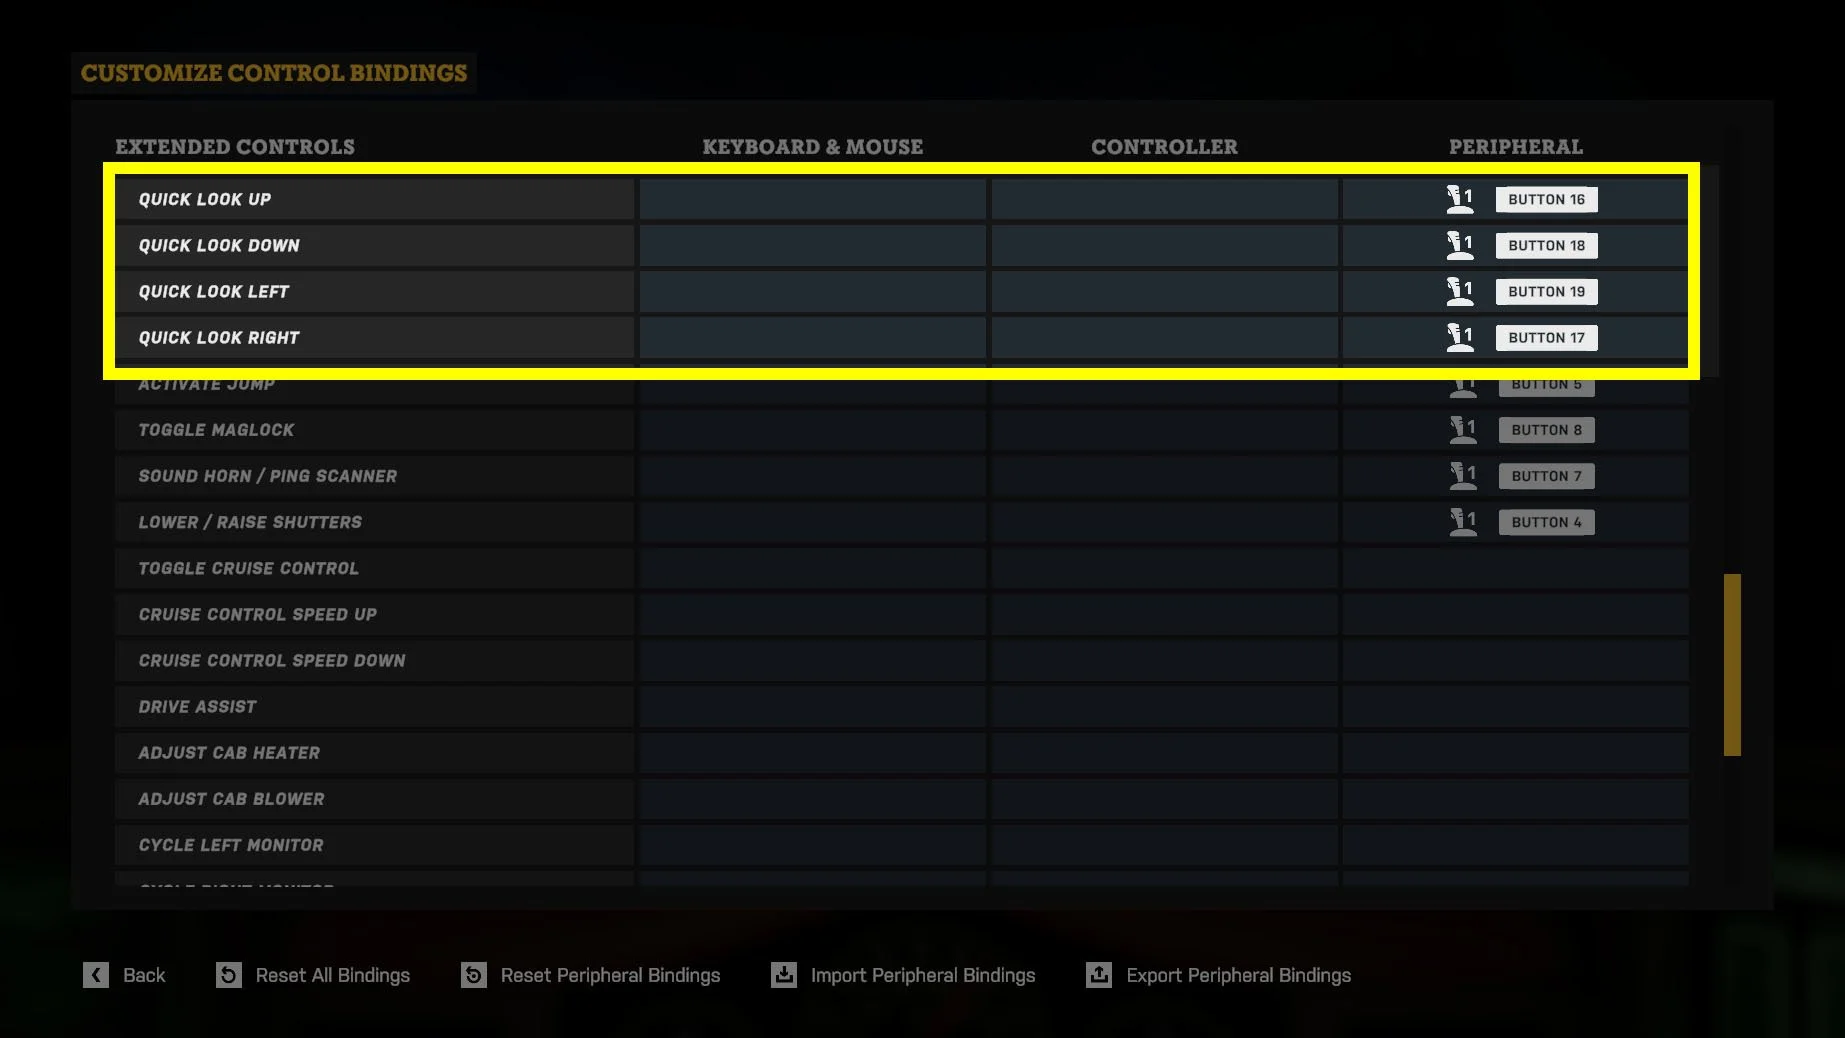
| Quick Look | • Allows player to glance around cab • Ideally mapped to HAT switch or D-Pad • Also controls the 3rd person camera |
| Activate Jump | • Lever directly above player in the cab • Allows warp gate to be activated |
| Toggle Maglock | • Lever to the left of the player in the cab • Allows truck to hitch trailers and dock with stations |
| Lower / Raise Shutters | • Lever up and right of player in the cab • Protects you from extreme heat |
| Sound Horn / Ping Scanner | • Lever up and left of player • Sounds horn & reveals salvage markers / NPC names |
| Adjust Cab Heater | • Dial forward and right of player • Adjust target temperature of cab |
| Adjust Cab Blower | • Dial forward and right of player • Adjust power of heater at expense of power |
Free Look Controls
Star Trucker also supports using a joystick mini-stick or a secondary joystick for full camera control. When combined with primary and secondary interactions, this lets you engage with the game world just as you would with a controller or mouse.
Note : Quick look will take priority if assigned to the same bindings as Free Look
| CONTROL | NOTES |
|---|---|
| Look Up / Down / Left / Right |
• Allows cab free look with joysticks or mini-sticks |
| Primary Interact |
• Use item in the world • This will also used as “select” in menus |
| Secondary Interact | • This will also be used as “back” in menus |
Quick Look Controls
The Quick Look feature was introduced as a way to make it easier to enjoy driving your star truck with peripherals. It works great with a hat-switch and by default supports tap to look in a direction and tap+hold to glance (camera will return to center once you release).
Note : Quick look (and Free Look) bindings are also used to control the external camera
| CONTROL | NOTES |
|---|---|
| Quick Look Up / Down / Left / Right |
• Allows quick look with joysticks or mini-sticks |
Non-Essential Controls
If all priority controls have been assigned you can consider bindings for remaining inputs, however these are not essential to core gameplay.
Pause and Map Screen Bindings
We also have two bindings at the bottom of the in-game list that allows the player to pause the game or open the map screen.
These bindings can not be changed on M&K or a standard controller; however it is sometimes useful to assign these to inputs on a peripheral.

Peripheral Settings
If a peripheral is connected you will also have access to the Peripheral Settings screen.
This screen brings together a set of very specific control settings to help tweak gameplay to work with a variety of peripherals. This is especially handy when trying to set up wheels or pedals.
To find this menu, press “Esc” to pause the game then select Options → Controls → Peripheral Settings
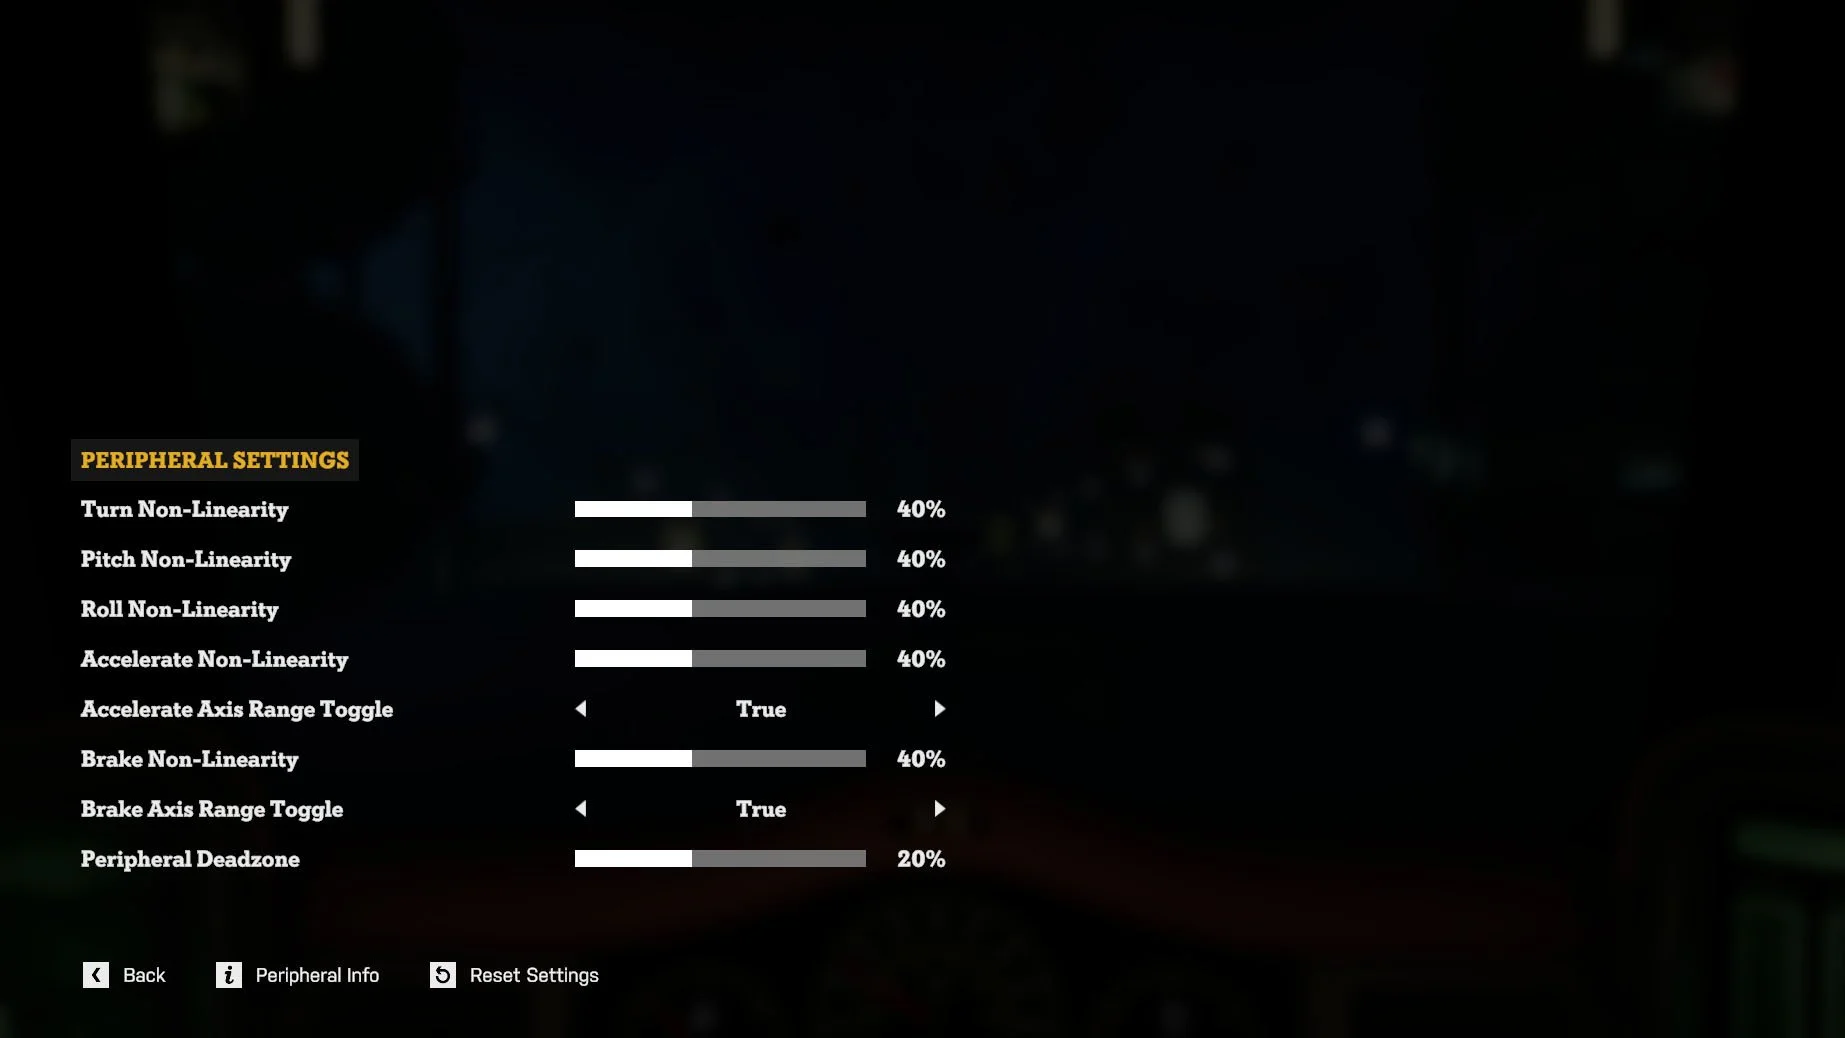
Non-Linearity Settings
These adjust how flat or pronounced the power curves are for a variety of manoeuvres. Helpful if a wheel or pedal is not feeling quite right.
Axis Range Toggles
These options allow you to enable full range toggles for both accelerate and brake without the need to edit the custom peripheral config file. This is commonly required when setting up pedals (e.g. if they only kick in when pushed half way down you’ll want to set these options to “True”)
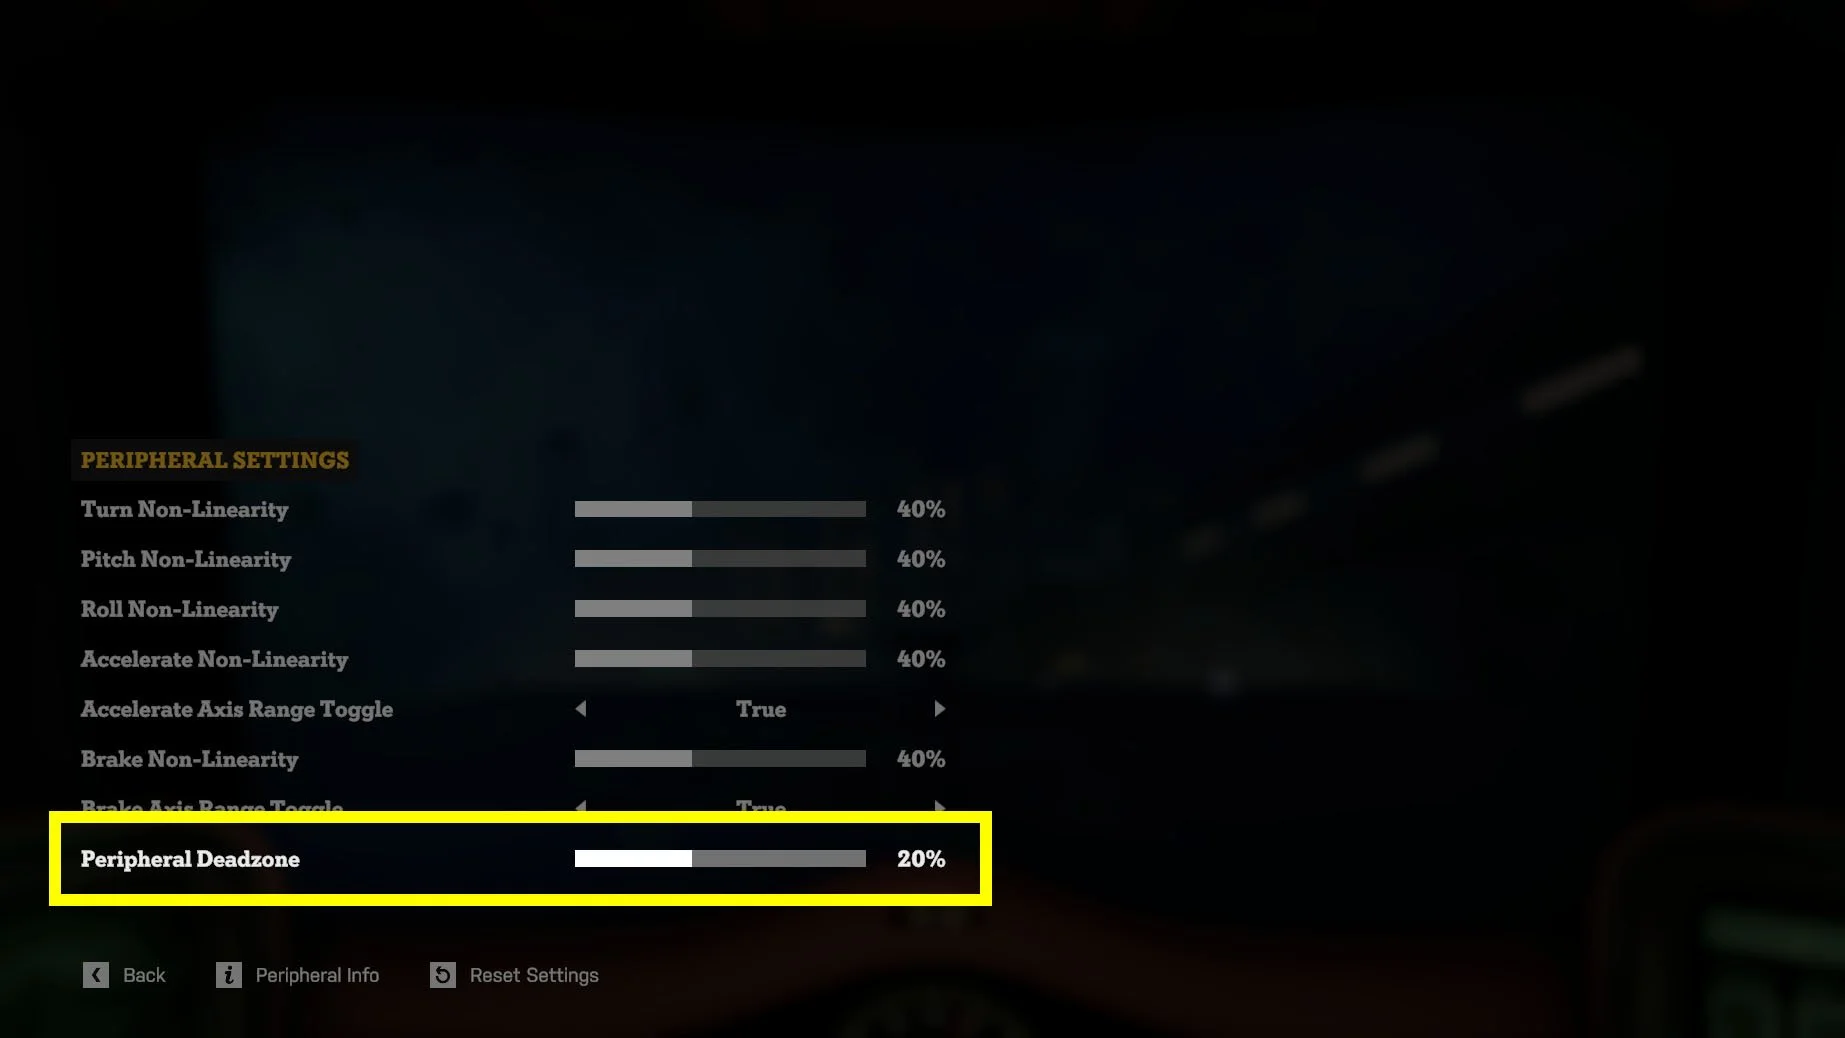
Peripheral Deadzone
This allows you to set the deadzone for peripherals. Unfortunately due to current limitations we can only assign one deadzone value to all connected peripherals. If you have multiple peripherals you might need to find a value that works as a compromise across all of them.
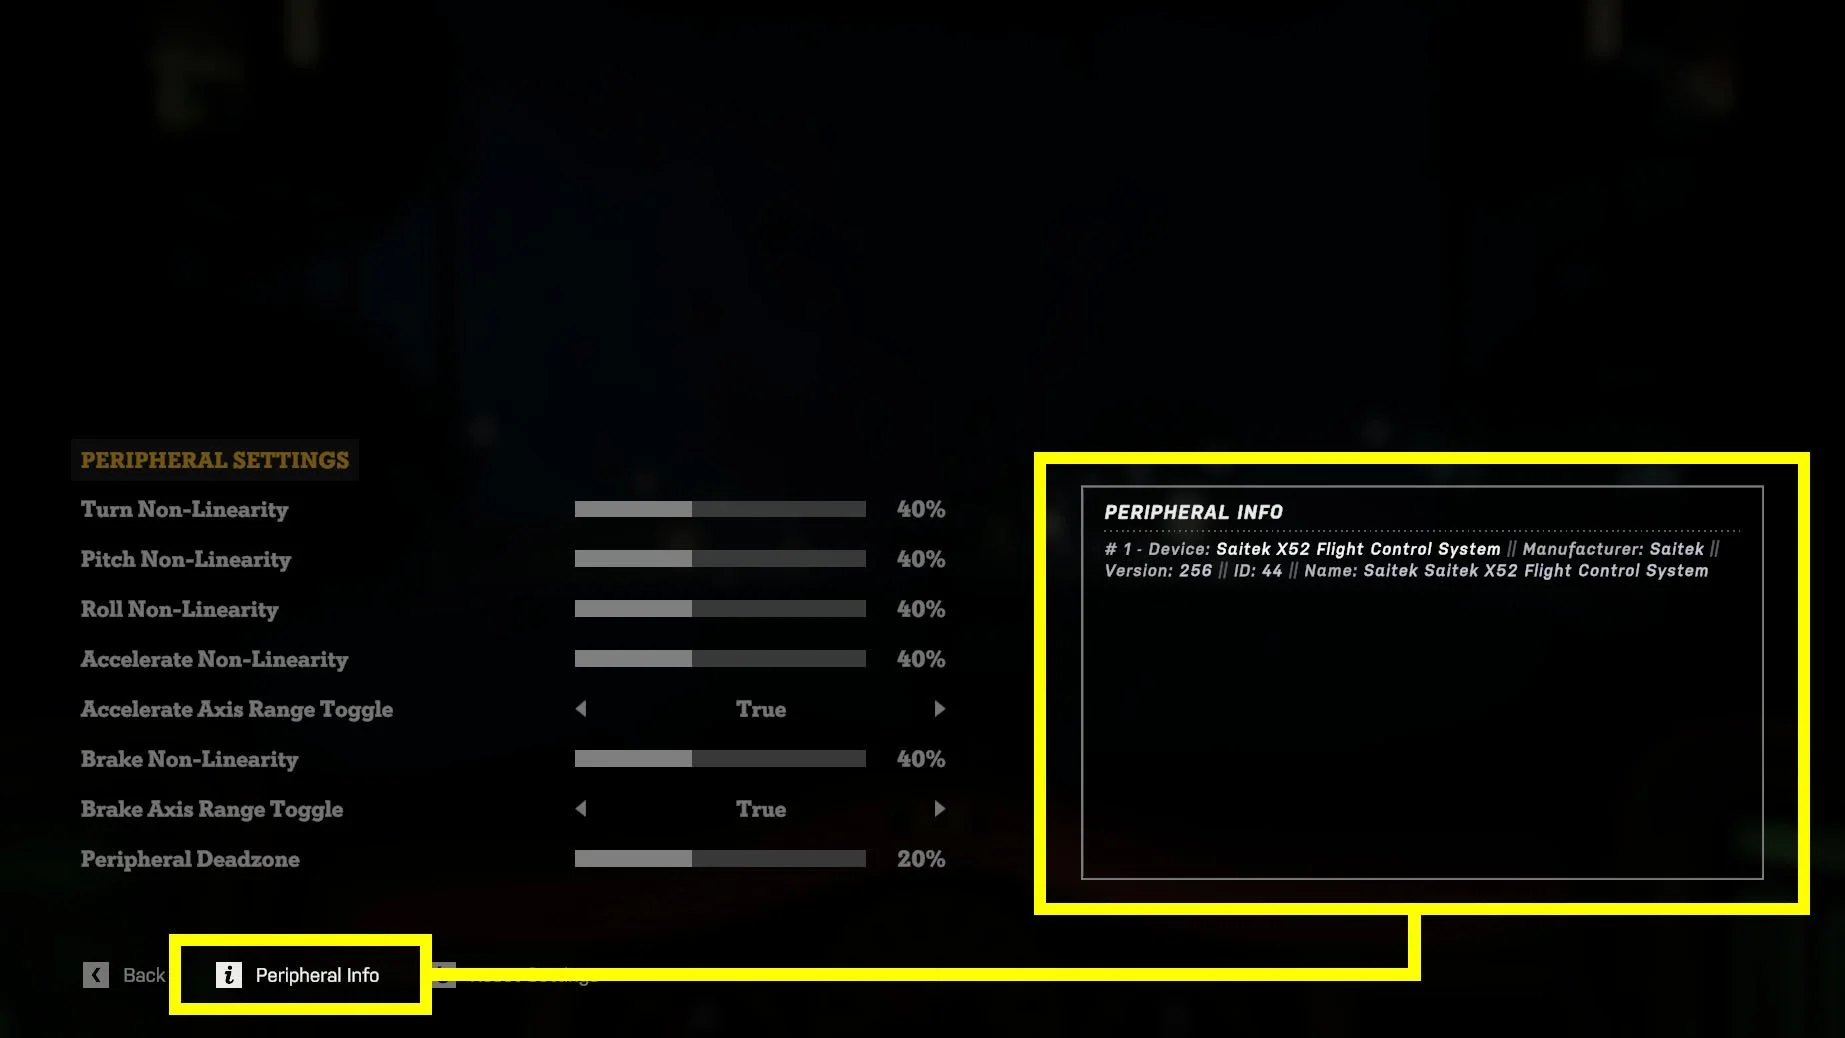
Peripheral Info
Enabling this panel will reveal some basic information on your connected devices. This is handy for determining which devices have been recognized and their associated names.
Quick Tips
You can use one or more devices to control your Star Truck
Free Look can be set by assigning up / down / left / right in Player Controls
How Quick Look interactions behave can be altered in the Controls settings screen
You can control the external camera via Quick Look / Free Look bindings
Disabling Brake Cut Off will allow a smooth transition from brake to reverse
Basic menu support for HAT switch / mini-stick will allow you to navigate most menus
Enabling CB Mic Auto Press toggle is handy for dealing with radio interactions
You can export and import custom bindings via Customize Control Bindings screen
Community Collaboration
With so many different devices and combinations of setups in the wild it’s been impossible for us to try them all ourselves.
So we hope you’ll help us out by submitting information regarding your devices alongside example custom binding files via our special Google submission form HERE. Once we’ve confirmed a new peripheral and binding config we’ll add it as a preset in a future update and update our Peripheral Tracking Sheet.
For more information about exporting (and importing) custom binding files check out our very high level summary below…
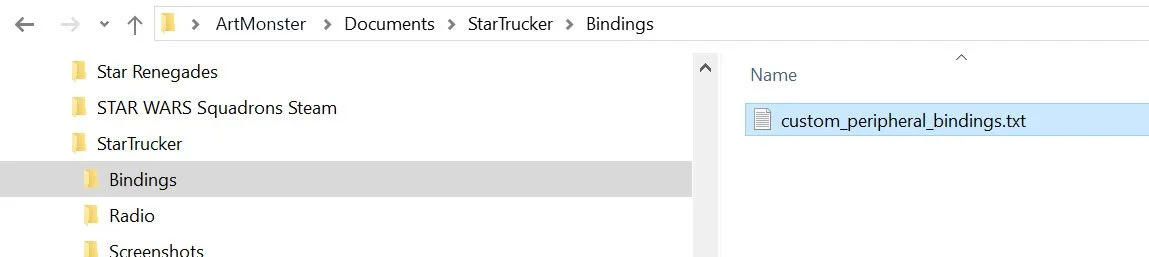
Export Bindings
This will export your current custom bindings to a text file: custom_peripheral_bindings.txt

This file can be found in your Star Trucker documents folder e.g. C:\Users\ArtMonster\Documents\StarTrucker\Bindings\
Import Bindings
This will import the bindings found in custom_peripheral_bindings.txt into the game overwriting any existing bindings.

Creating New Presets
The core reason for custom_peripheral_bindings.txt is to allow the community (and hardware manufacturers) to create custom binding presets for the game. For example:
1. Plug in unrecognised hardware
2. Use Custom Control Binding screen to set appropriate controls
3. Export peripheral bindings
4. Copy and rename custom_peripheral_bindings.txt appropriately for the hardware used
5. Share this file with the community / developers ( Peripheral Presets Submission Form )
As previously mentioned we will take confirmed presets and add them to future updates so that new players will have a good chance of the game automatically detecting their device(s).
Known Issues
First Person Gameplay
Star Trucker was designed with multiple gameplay modes in mind. With this update we’ve focused on making sure the extended controller options work nicely when driving your truck.
If set up correctly peripherals can still be used for interactions like replacing power cells or repairing your truck but it is not recommended.
You Can’t Use Keyboard and Peripherals Simultaneously
We do not currently support using the keyboard AND peripherals at the same time. This is mostly fine but it means you can’t use a keyboard with any press and hold inputs, such as accelerate and brake, at the same time as using a joystick to turn.
Peripheral Deadzones
Unfortunately due to current limitations we can only assign one deadzone value to all connected peripherals. If you have multiple peripherals you might need to find a value that works as a compromise across all of them.
Pedals Register from Mid-Point by Default
Because pedals are reported as being a full axis with a value from -1 to +1 acceleration and brake only kick in after the pedal has been pushed beyond the halfway point ( 0 ).
This can be fixed by setting the appropriate “Axis Range” toggles in the Peripheral Settings Screen to “True” or assigning a “True” flag on the appropriate binding in your custom binding config file and re-importing.
Visual Oddities Using New Bindings In External Camera
Some features in Star Trucker were never designed to be seen in external camera view. The result is some new shortcuts allowing you to see how we fake some moments such as hitching, docking and entering a warp gate.
Menu Interactions
Although we’ve done some work around navigating various menus, some screens will not be particularly suitable for peripheral controls ( e.g. game screen tabs / map screen ). We advise switching back to M&K or controllers for any complex menu interactions.
It’s also worth mentioning that, at present, you can not use the HAT switch or mini-stick of a second joystick to navigate menus.
Custom Binding Helpers
It’s a lot of work to update the various button helpers across the game to show the appropriate peripheral bindings. For now we show M&K or Controller helpers but will continue to investigate improving this area of the game in future updates.
FAQ
Below is a selection of questions and answers that we hope resolve the most common issues you might encounter and generally improve your experience…
• Why is the game not recognising my peripheral?
• Can I prevent the truck engines from cutting out while using a throttle?
• How can I make my steering wheel more sensitive?
• Why do I have to press my pedals so hard to accelerate and / or brake?
• Is it possible to re-centre my view?
• Why isn’t Free Look working?
• Is there a way to mimic my hotas setup in-game?
• Is it possible to disable the camera drift from truck momentum?
• Why is my truck drifting / options not selecting correctly?
Why is the game not recognising my peripheral?
The first step is to make sure you have the latest drivers installed for your device.
If your PC recognizes your peripheral then in “theory” so should the game. Saying that there might still be some devices that don’t play nicely. We’ve started a tracking sheet HERE. This will be updated over time as we gather more information from the community so be sure to keep an eye on it.
If you continue to have issues please contact the Raw Fury Support Desk
Can I prevent the truck engines from cutting out while using a throttle?
You sure can! Head to the Controls Settings screen. Set the Brake Cutoff toggle to “Off”. The truck will now smoothly transition from brake into reverse.

How can I make my steering wheel more sensitive?
As we can’t “guess” a peripheral is a steering wheel you’ll likely need to tweak a couple of options. Head to the Peripheral Settings screen via the Controls settings screen. From here you can do two things…
1. Increase the Turn Non-Linearity - this will mean less wheel travel is needed to hit peak thrust
2. Reduce the Peripheral Deadzone - The game will acknowledge you’re turning the wheel sooner

Why do I have to press my pedals so hard to accelerate and / or brake?
Pedals often report values that need to be interpreted slightly differently. There’s no easy way to detect this but we have an in-game solution
Head to the Peripherals Settings screen. Here you will see options to toggle the Axis Range for both accelerate and brake. Set this to “True” for any pedals not working as expected. They should now use the full range of pressure.

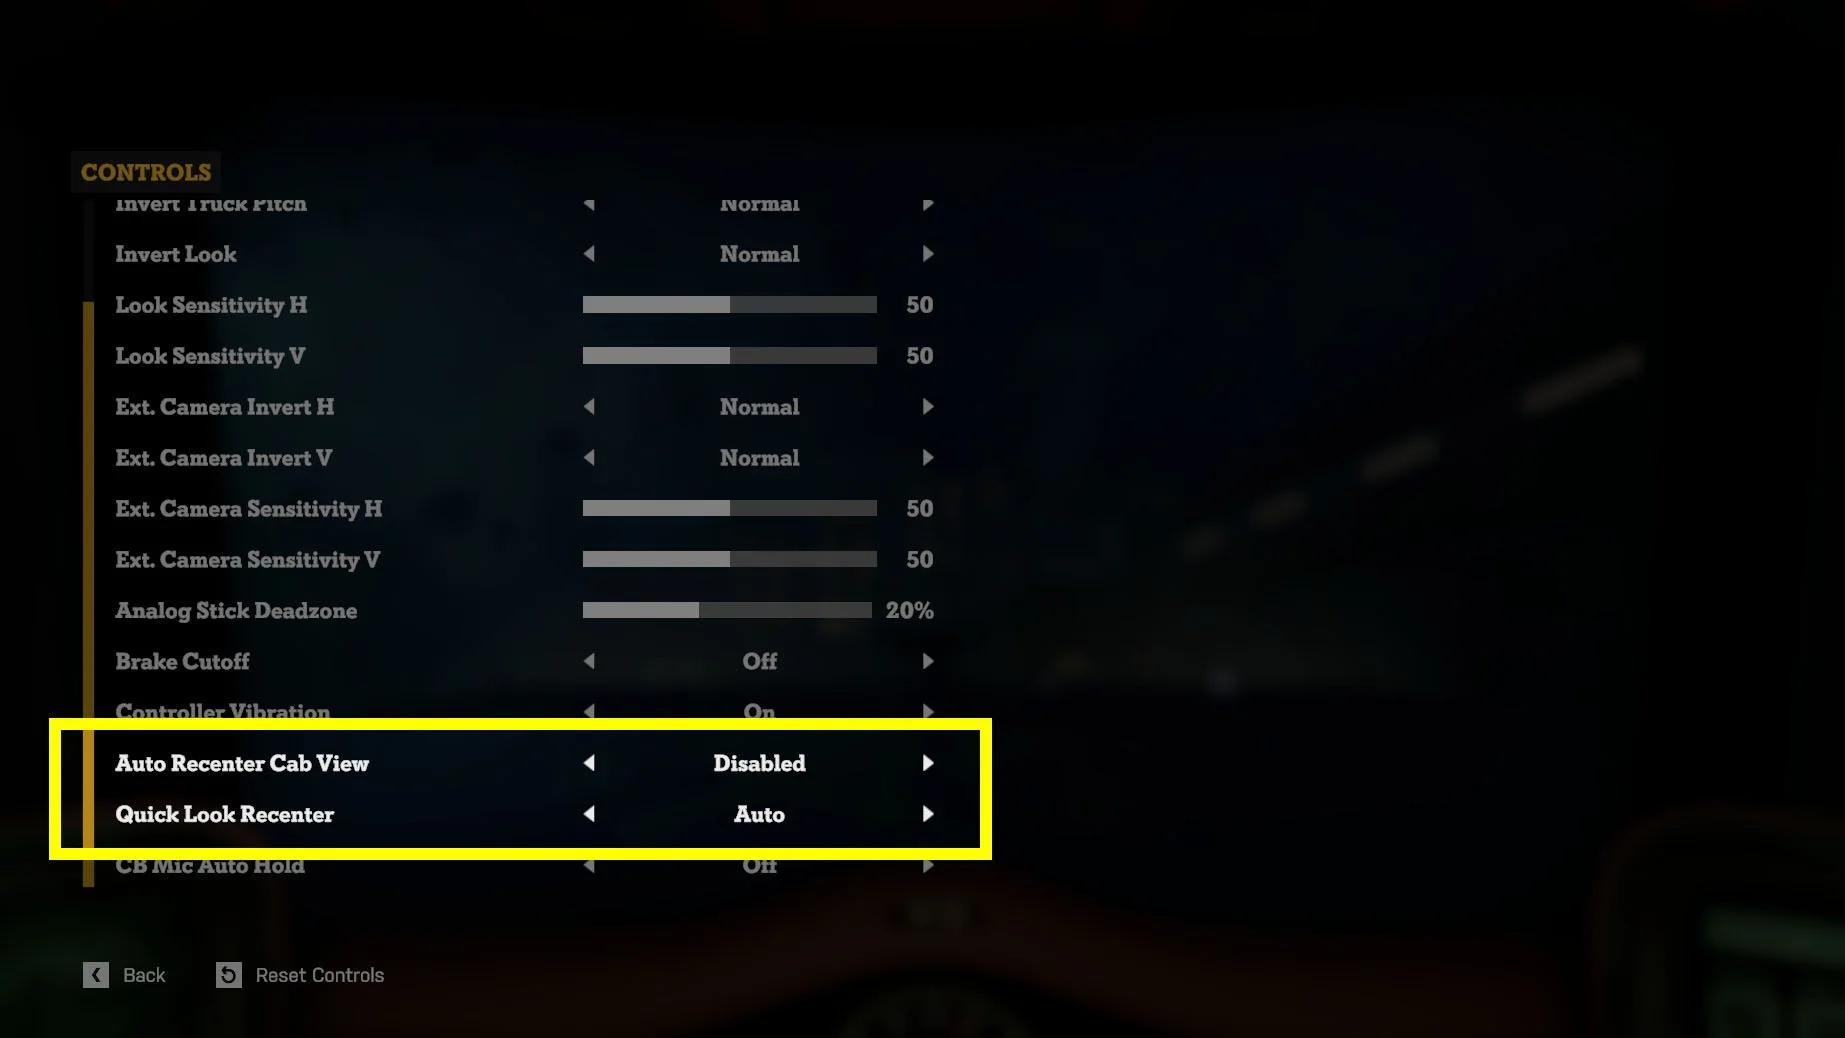
Is it possible to re-centre my view?
Yup. You have two options here. Either manually set a binding that will reset your cab view OR enable the Auto-Recenter Cab View setting in the Controls Settings screen. This will automatically recenter your view after the desired amount of time.
Why isn’t Free Look working?
Firstly you might still need to set up Free Look controls. This can be done by assigning unique bindings to the Player Controls look bindings in the Custom Control Bindings screen.

Alternatively you might have Quick Look assigned to the same bindings as Free Look. In this instance Quick Look bindings will take priority.
To address the problem you will need to either assign different inputs for player look or clear your Quick Look bindings.
Is there a way to mimic my hotas setup in-game?
To an extent! It’s possible to switch around the joystick and throttle cab visuals. You can also flip the location of emergency brakes and maglock. These options can be found in the Game settings screen and act as simple toggles.

Is it possible to disable the camera drift from truck momentum?
Yes. You can reduce the drift to “0%” on the Game settings screen to effectively disable any camera rift that occurs from truck momentum both for the cab view and external cameras.
Why is my truck drifting / options not selecting correctly?
Firstly check to make sure your joystick / throttle / wheel etc. are resting correctly in their default position. If this checks out OK, try increasing the Peripheral Deadzone in the Peripheral Settings screen.